5 vector mask tips using the pen tool
Roughly a 6 minute read by Adam Buchanan

Just several icons below the Lasso Tool in Photoshop lies the final step towards an acclaimed non-destructive workflow - yet for some reason, countless designers still stray away from the Pen Tool when it comes to masking layers.
Rounding up objects with the Lasso Tool is something nobody should be admitting to, but to actually use this wild west apparatus day-to-day within the industry is another matter - especially with the precision, editability, and additional controls the Pen Tool and Vector Masks offer.
Although Vector Paths and Anchor Points can be a bit difficult to master at first, with a little practice you can join the true professionals in the ring.
From this point on we’ll assume you’re comfortable using the Pen Tool (If not, YouTube’s got you covered!) and ready to reign in your skills.
Use multiple paths within a single vector mask
Photoshop doesn’t make this feature an obvious one, but you’re actually able to plot multiple Vector Paths on a single Vector Mask.
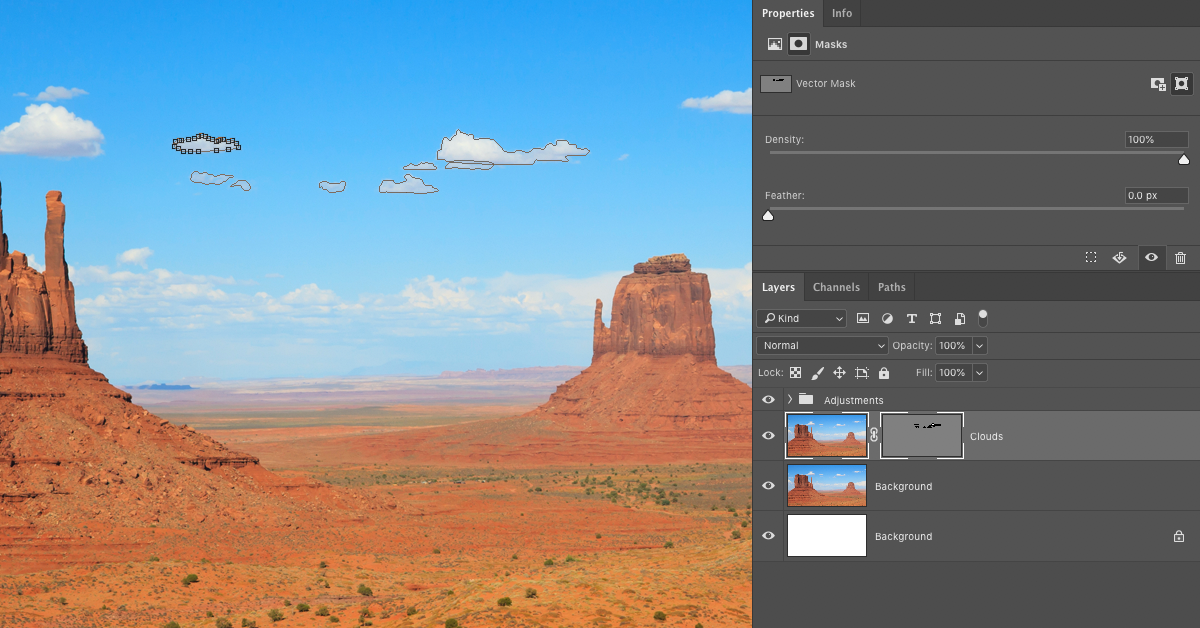
For example, it’s easy enough to pluck every cloud out of a photograph of the sky all on a single layer. Once completing the path around one cloud, make sure you’re still on the same layer and click down with the Pen Tool once more to place the first point of your next path. Continue and repeat this process as many times as needed.
Stop cutting out complex objects with a single path
The other advantage to using the multiple paths on a single mask technique detailed above is that it’s perfect for cutting out complicated objects with much more precision.
In this example, let’s use an action shot of a someone still using the Lasso Tool.
Instead of trying to separate the cowboy from the background with a single Vector Path, it’s much easier plotting unique paths for each individual area/object such as the clothing, rope, hat, horse, and boots.
Why? Well let’s take a closer look at where the rope passes over the cowboy’s arm. As the red shirt tucks under the flying rope there’s a clear change between two different colours, textures, and directions. A single path approach to cutting out these objects will never have the same accuracy as following each one individually, overlapping each other.
This new technique will not only give you much more control as to where the divides and intersections between different shapes are, but also speed up your workflow and provide more accurate cuts - all of which still on the same layer.
Feather your masks
Once you’ve got a Vector Mask applied to a layer you can tweak it a little further using the Properties Panel.
Within this area lie two options. Density, a slider to alter the mask’s transparency (not to be confused with the layer’s transparency), and Feather, a slider which changes how soft the mask cuts into the image.
Using the cloud example earlier in this article we can now soften the edges of the cloud to make the cut more realistic, and ready it for use on a different background. Simply move the Feather slider to the right to determine a softness in pixels.
The only issue remaining here is that the Feather slider is a global control for all paths on a single mask. This means every path on a single layer will adopt the same strength of feather, unless…
Move paths between masks
If everything you’re cutting out is at the same depth visually, or has the same softness around the edges, a single Vector Mask with multiple paths is the best way to go.
But what about the hair on our horse or a cloud further away in the background from our previous examples? Both of these have much softer edges compared to other objects in view and will need their own unique feather controls in the properties panel - something that can only be achieved with multiple layers containing their own Vector Masks.
The process here is exactly the same as before. Whip around as you would with the Pen Tool and mask every object you need on a single layer. Once you’re happy, you can use the Path Selection Tool (the black cursor) in the toolbar to click and select individual paths you’ve made. With one selected, cut your selection onto your clipboard and paste it onto a duplicate of the original layer.
Repeat as many times as needed for each individual element you need more control over.
Combine clipping paths and vector masks
Using every step detailed above you should be well on your way to creating perfectly masked layers. That said, there’s one possible hurdle you might still face no matter how neat and accurate your Pen Tool skills are.
Additional colours, over-exposure, and light leaks around the edges of your objects are often an unavoidable problem when masking layers. These annoyances can originate from the clash of another object overlapping, or a bright light behind the subject bleeding around the edges.
Occasionally you’ll be able to crop in a little tighter on your cut to alleviate these issues, but sometimes this isn’t possible as you’ll need to maintain the original shape of your mask. If the latter, a clipping mask is all you need.
By clipping a layer to your newly masked object you’re able to paint within and patch up the edges as needs be. This could be through taking a nearby colour pick and painting over the issues, or instead taking a copy of a suitable area elsewhere on the original object and blending it into place.